


 Years ago, I wrote a couple of guides on how to retain a fully functional Windows XP (32-Bit) and Windows 10 (64-Bit) on modern hardware, including integration into the then-latest NVIDIA Geforce 900-series cards, solid-state SATA drives and so on. Both of these articles proved much more popular than I ever imagined, given the increasing obscurity of their practical usefulness. My article about NVIDIA cards and XP, in particular, became heavily linked around the Internet and across many forum discussion threads from other XP diehards.
- Windows XP Drivers for NVIDIA Geforce GTX 970, 980, 980 TI and Titan X, say what?!
- Dual Boot Windows XP 32-Bit and Windows 10 64-Bit on an SSD Drive
Now, in the year 2021 and on the cusp of Windows 11, is any of this still possible? In short, yes... But there are more caveats and quirks as modern hardware and software evolves in complexity and XP becomes increasingly obsolete. I should emphasize that if you really want to use XP these days, you are much better off using a standalone system with XP-era hardware as the basis. My convoluted modern dual boot approach is ill-advised unless you're an absolute mad man, and any attempt to do so is at your own peril.
All of that said, I currently have a perfectly functional dual-booting modern computer that houses both Windows XP 32-bit (circa 2001) and Windows 11 Professional 64-bit (circa 2021) on a single 1TB Samsung SSD 860 EVO. Games and applications run flawlessly on both. I can single-click boot from one OS to the other, access both partitions and other drives from either of them, utilize 2K/4K displays, dual monitors, 5.1 surround sound on a shared speaker system, 2i2 professional audio recording, USB 3.0 and more.

I was initially planning to meticulously chronical the entire process and even captured most of the installation and struggles on film, but in truth most of the guide from my original Windows 10 article is still largely relevant as a starting point. Besides, just going over the newfound conflicts and intricacies that many users will face while attempting these efforts in the year 2021 and beyond is going to be a long enough read as-is.
Base Hardware
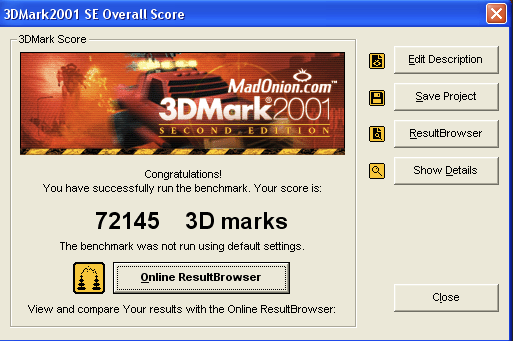
Most of the hardware used in this experiment is not much different than it was for my Windows 10 dual boot approach. The hardware is now several years old but still scores within the top 30% of systems according to benchmarks, and was built for Windows 10+, not for legacy operating systems. It runs Oculus Rift VR software perfectly with the help of a 2070 Super and a still decent 4790K CPU. My 3DMark 2021 score on Windows 11 is around 8,500 (Battlefield V 1440p Ultra @ 100+ FPS) and my PCMark 10 score is around 6,030 (8,830 for Essentials, 8,525 for Productivity, 7,910 for Digital Content). On the windows XP 32-bit side, my 3DMark 2001 score at 1920x1080 is 72,145. Both systems are working great for their intended purposes.


The only substantial differences between the original hardware configuration and my current one is I have an MSI Z97 Gaming 7 motherboard instead of a Gaming 5, and a GTX 2070 Super instead of a GTX 980 TI. But I also have a trustworthy GTX 680 that is still perfectly powerful and will come in handy as explained later on. Below is
- POWER SUPPLY: EVGA SuperNOVA 1000 P2 220-P2-1000-XR 80+ PLATINUM 1000W
- MOTHERBOARD: MSI Gaming Z97 GAMING 7 LGA 1150 Intel ATX
- PROCESSOR: Intel Core i7-4790K Devil's Canyon Quad-Core 4.0 GHz LGA 1150 88W
- MEMORY: G.SKILL Ripjaws X Series 32GB (4 x 8GB) 240-Pin DDR3 SDRAM DDR3 1600 (PC3 12800)
- VIDEO CARD: EVGA GeForce GTX 2070 Super PCI Express 3.0 x16
- SOUND CARD: Creative Sound Blaster AE-7 5.1+ PCI Express x1
- HARD DRIVE (PRIMARY): Samsung SSD 860 EVO SATA (1 TB)
- HARD DRIVE (SECONDARY): Multiple SATA drives (1-8 TB)
- OPTICAL DRIVE: SONY Black Blu-ray Burner SATA BD-5300S-0B - OEM
- MONITOR (PRIMARY): LG 27GL850-B 27" Ultragear QHD 1ms G-Sync
- MONITOR (SECONDARY): ASUS VG248QE Black 24" 144 Hz
- AUDIO INTERFACE: Focusrite Scarlett 2i2
- WEB CAMERA: Logitech HD Pro C920
- CARD READER: Rosewill RDCR-11003 - 3.5" 74-in-1 Internal Card Reader with USB 3.0 Port
- USB ADAPTER: SupaHub PCIe to Type C (1), Type A (4) USB 3.0 5-Port PCI Express Expansion Card
- INTEGRATED ETHERNET: Killer E2200 Gigabit Ethernet
- USB WIFI ADAPTER: Netgear A6200
Again the main struggle with getting XP to cooperate will be finding compatible drivers for the necessary components, since more manufacturers only support drivers for Windows 7+.
Windows XP 32-bit vs. 64-bit
RECOMMENDATION: Stick with Windows XP 32-bit for the most faithful and compatible solution for 16-bit and 32-bit programs.
 I discuss this a bit in my original XP articles, but want to reiterate once again. Your specific XP needs will dictate which architecture you should go with. The 64-bit architecture vastly expands the memory limitation and enhances dual CPUs. If you're trying to utilize a super memory-intensive product or just want to harness the absolute maximum extent of your physical hardware possible (e.g., 32GB of RAM in my build) then 64-bit may be your calling. The same is true if the software you're utilizing demands a 64-bit platform, although that would be a very rare occurrence. From my own experience, the performance differences between 4GB and 32GB of RAM in a Windows XP environment is indistinguishable.
If you're perfectly comfortable with a 4GB RAM limitation and have no urgency for 64-bit XP software, my recommendation remains to stick with 32-bit. This is a more true-to-form XP edition and a much more accurate descender of Windows 98 SE. This version of Windows XP will provide you with the most compatibility with legacy DOS, 16-bit and 32-bit programs. Almost every software program and driver was devised for 32-bit XP since that was by and large the most popular variant through the mid-2000s. The 64-bit version is actually built upon an NT kernel and its compatibility can be more touch-and-go.
Windows XP Installer and Activation
When I wrote my original XP dual boot guide, it was still possible to activate a genuine copy of Windows XP through their online services. My approach for XP installs was always a genuine Windows XP CD slipstreamed with SP3 integrated updates and then activated through the official activator and my valid key(s). Since that time, Microsoft has shutdown all online activation processes. Their phone activation service may still be lingering to some extent, but can be a very time-consuming and error-prone process. This has resulted in a large number of annoyances pertaining to boot and sign-in, where non-activated installs will outright reject sign-in after a certain number of boots.
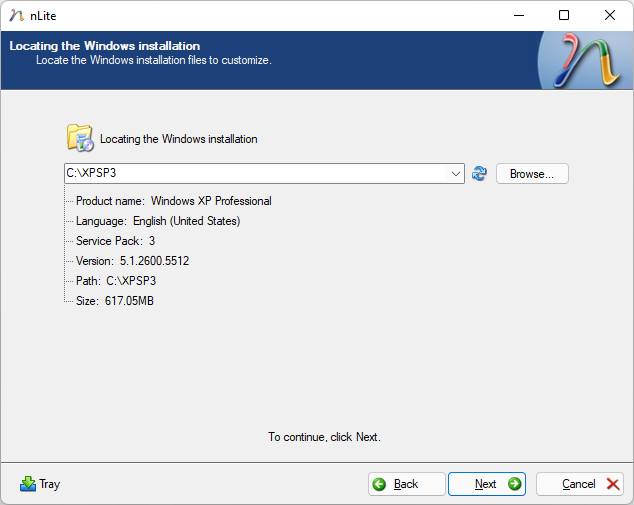
While there are a bunch of workarounds, patches and tools to circumvent the now impossible activation process, I still prefer to keep it as vanilla of an install as possible. Conveniently, a pre-activated, clean version of Windows XP 32-bit with SP3 exists as a disk image on Archive.org. Although this will nicely cure the now defunct activation process, there will be a bit more slipstream work necessary for the SATA drivers (discussed below). Once the ISO has downloaded you'll need to extract the contents to a new folder so that nLite can find it.
SATA Drivers and Windows XP Slipstreaming
This is a problem that I detailed in my original article, but an important concept to cover in a little more detail. The Windows XP installer does not natively support SATA chipsets needed for modern hard drives and SSDs. Traditionally, you could download a compatible driver onto a floppy disk to load during boot, but modern computers obviously lack diskette drives. To add, modern motherboards including the Gaming 7 do not provide an XP-compatible SATA driver.
In order to circumvent this and support detection of SATA-connected drives, we have to slipstream custom drivers into a clean XP installer. While there are some packages out there that include everything but the kitchen sink (e.g., Zone 94's XP Integral Edition) and have some boilerplate SATA drivers, I prefer a more purist approach of only installing the minimum needed to get things installed and then adding on from there. Plus the super-loaded packages generally run beyond the size of a normal CD, whereas vanilla XP can be burned to any 650MB or 700MB disc without trouble.
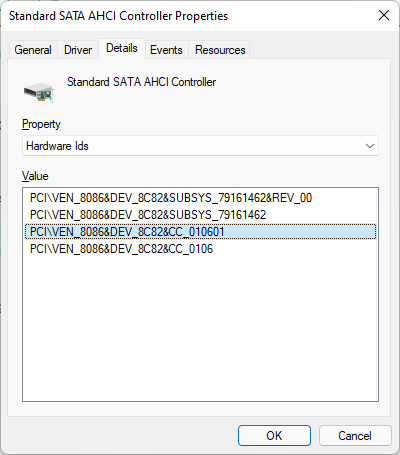
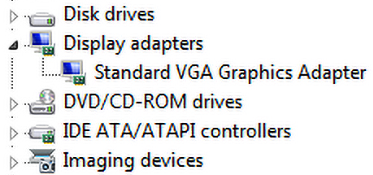
As a baseline you'll need to determine the hardware identifier for your IDE/SATA controller(s). This can be done from the device manager under IDE ATA/ATAPI Controllers. If you go into the Properties and then select Details → Hardware IDs you'll see a string that determines your controller. This will vary by motherboard and revision, even the Gaming 5 vs. Gaming 7 motherboards have different identifiers. In my case, the two SATA controllers include "PCI\VEN_1B21&DEV_0612..." (Asmedia 106x SATA Controller) and "PCI\VEN_8086&DEV_8C82..." (Intel 9 Series Chipset Family SATA AHCI Controller).

Another recommendation alongside this hardware check is to verify the chipsets via the manufacturer manual. In the manual for my MSI Z97 Gaming 7 motherboard, we can see that SATA slots 1-6 are powered by the Intel Z97 Express Chipset and slots 7-8 are powered by the ASMedia ASM1061 Chipset. Since the Intel chipset is tightly integrated into the motherboard and BIOS, the primary boot drive should be connected to SATA 1. This also will ensure that even if additional drives get added, removed or swapped it shouldn't affect the boot arrangement that resides on disk 0.
This approach of identifying device hardware will prove especially valuable when it comes time to research compatible drivers for XP. A lot of times the name brand manufacturer won't have XP drivers but we can still find compatible devices that do have some floating around. For modern Intel and AMD chipsets, there's no better source for patched drivers than the legendary Fernando of Win-Raid Forum. Threads exist with custom drivers and nLite slipstream instructions here:
- Integration of Intel's AHCI/RAID Drivers Into a Windows XP CD
- Integration of AMD's AHCI/RAID Drivers into a Windows XP CD
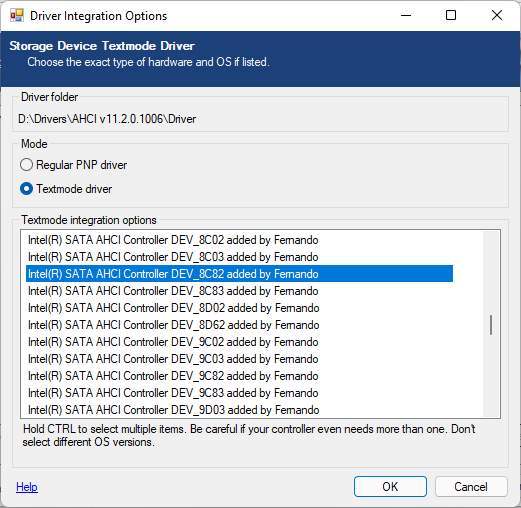
There are also formal XP-based drivers for the ASM1061 chipset, but since my boot drive is connected to SATA 1 (Intel) that is irrelevant for installation. For my planned 32-bit XP install, I downloaded the "Universal 32bit Intel RST textmode driver v11.2.0.1006 mod (05/11/2021)" from the Intel link above and extracted it to a memorable location. Then from nLite I select the extracted XP disk image location, enabled Drivers and Bootable ISO options (you can enable and configure the other sections as desired), selected Insert → Single Driver and browse to the previously extracted SATA drivers ("iaAHCI.inf") → Textmode Driver → Intel(R) SATA AHCI Controller DEV_8C82 added by Fernando (whichever DEV code matches the one found via Device Manager above). I should mention that for your configuration you may wish to add additional drivers (especially for USB devices) at this point. Finally you can click Make ISO and save it.


With all of that done, a fresh and bootable ISO will be generated that can be burned to an ordinary CD-R disc using the default burning tool included on Windows or any free alternative such as the excellent ImgBurn. This would be a good time to attempt booting from the Windows XP disc and getting to the Disk Utility screen to verify that your primary SSD is accessible and that no BSOD results.
While it is possible to create bootable USB drives instead of physical CD/DVD media for both Windows XP and Windows 11 installations, I wholeheartedly recommend sticking to physical disc-based media to alleviate driver conflicts, USB incompatibilities and to make the process as malfunction-free as possible.
Windows 11 License and Activation

Many Windows 10 users inherited their license by upgrading Windows 7 or Windows 8 and therefore have no tangible CD key. These licenses are wired to your computer hardware and/or your Microsoft Account. If you are embarking on this effort with your production machine that already has Windows 10/11 installed, you will want to ensure that you have your license associated with your Microsoft Account and that it is fully activated before you attempt any formatting and reinstall — especially if you are moving from Windows 10 to Windows 11 for the first time. As much as I prefer local accounts, it is still valuable to sign in using a Microsoft Account from your existing install to ensure that your OS is activated and cloud stored for easy activation in the future.
To verify the status of your activation, you can go to Activation Settings and review the message and status. If you see the message indicating that Windows is activated "with a digital license linked to your Microsoft account" you will be good to go and can easily recover your activation on a fresh install by signing back in. Otherwise you can follow the prompts/troubleshooting to ensure you get your license cloud-stored through your Microsoft Account.
Windows 11 is increasingly persistent that you use an online Microsoft Account, although I recommend you still install the OS with a local account instead. From my experience, it is quite straightforward to reactivate Windows by eventually signing into an online account. Activation is crucial with Windows 11; you can't even personalize the taskbar if the OS is not activated. In my case I also had swapped motherboards and had a different hard drive configuration, but by selecting "Troubleshoot → I Changed Hardware on This Device Recently" I was able to easily get it reactivated with my existing Windows 10 key even though I hadn't previously installed or activated Windows 11.

If you proceed with a format and reinstall before you've linked your Windows license to an online account — especially with this unconventional dual boot setup — you risk more headache trying to get Windows 11 activated.
Windows 11 and TPM 2.0 / Secure Boot
The only drastic hardware-related change for Windows 11 is that it enforces TPM 2.0 and Secure Boot hardware. This is an effort to help combat ransomware and malware attacks that have plagued the OS for years and also represents one of the most cutting edge hardware demands Windows has ever demanded.

The inherit problem with this is that even relatively current hardware developed during the course of Windows 10's life may not accommodate these security requirements. This has been a controversial requirement, as The Verge emphasized: "WINDOWS 11 WILL LEAVE MILLIONS OF PCS BEHIND...Windows 11 will require Intel 8th Gen Coffee Lake or Zen 2 CPUs and up, TPM 2.0 (Trusted Platform Module) support, 4GB of RAM, and 64GB of storage."
My Z97 Gaming 7 motherboard supports dual BIOS including UEFI and the Secure Boot option. It also supports a 14-1 pin TPM module, although initial research suggests the setup may be limited to TPM 1.2. Currently I have no TPM module and Secure Boot disabled, which is perfectly comfortable to me just as it has been through all the years on Windows 10. However, attempting to install Windows 11 using my setup would throw the following error:
Overriding the Secure Boot Requirements
NOTE: If you're following my original Windows 10 dual boot guide, this entire process would be done after Windows XP has already been installed and you are on the next step of installing Windows 11.
At the time of this writing in September 2021, only Insider editions of Windows 11 are available. It is possible options may change as it progresses toward final release, but currently there are some registry options that can be applied during the setup screen to automatically overwrite TPM, Secure Boot or RAM requirements. This is the approach I will use to get Windows 11 installed on my existing hardware, while also ensuring XP compatibility with minimal hassle. There are several in-depth guides on this topic, but the gist is:
- Boot using the Windows 11 installation disc.
- Proceed until you reach the "This PC can't run Windows 11" screen.
- Enter the in-place Command Prompt using the keyboard shortcut SHIFT + F10.
- Launch Registry Editor by typing Regedit <enter>.
- Navigate to the key: Computer → HKEY_LOCAL_MACHINE → SYSTEM → Setup.
- Create a new key titled LabConfig.
- Create DWORD entries within the LabConfig key for any of the following: BypassTPMCheck, BypassRAMCheck, BypassSecureBootCheck and set their values to 1 to circumvent those respective checks.
- Exit Registry Editor and Command Prompt.
- Click the top-left Back Button and then click Next. You should now be at the disk selection screen.

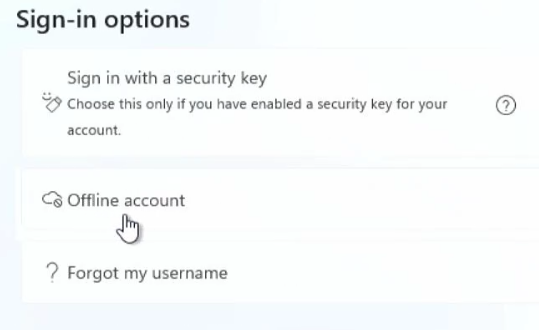
I enabled all three for illustration, but obviously the RAM requirement was met by my 32GB so is unnecessary here. After completing these steps you should be able to ordinarily install Windows 11. As I noted previously, Microsoft is making it increasingly tedious to stick to a local offline user account. However, during installation I still recommend starting with a local account for establishing basic path/user configuration details. You'll have to click Sign-in Options → Offline Account and then complete a series of security question prompts, in which Microsoft still attempts to get you to switch to an online account.


Graphic Card Support for XP
 In my original NVIDIA XP article, I explained a simple manner of patching GTX 960 drivers to support the full range of 900-series devices including the 980 TI and Titan X. At the time, NVIDIA was still pushing out updates to the driver set so it was possible to retain completely modern updates in an easily patchable manner. Their final Windows XP driver was published on July 14, 2016. Since then, they released their Pascal-based of GPUs with the 10 series followed by their Turing-based 16 and RTX 20 series, and then the Ampere-based RTX 30 series.
None of these more modern GPUs from the GTX 1000 onward contain any version of XP-compatible drivers.
Although the patch approach can sometimes still be used to run through the installer, the end result remains an unsupported GPU that underneath is only operating in legacy VGA and software-based rendering mode, basically no different than having no drivers at all. NVIDIA engineers confirmed that they don't even have an internal source for any XP-compatible drivers for any of these later architectures, so any attempt to create them from what's available would prove futile given the vastly different architectures between the 900-series and everything since.
Here are four alternative options for you to consider, from least recommended to most recommended:
OPTION 1: Stick with a 980 TI or Titan X (...but you'll increasingly be missing out.)
 The 980 TI and Titan X are still powerful GPUs in their own right. 4K supported, virtual reality compatible, and all the core technologies like DirectX 12 used in most modern games. They are also old enough that they aren't part of the major chip shortage distress and can be found used for $200-$350, even in this era of mining and GPU hoarding (new ones are also still being sold but will set you back nearly $700). I was still enjoying modern games and VR adventures perfectly fine on my 980 including with a triple monitor setup. Realistically, you will be able to continue enjoying a lot of modern games on these chipsets, but may increasingly find barriers as system requirements and hardware demand continues climbing, forcing you to downgrade visual quality to medium or less. And while certain heavily demanding titles like Half-Life: Alyx put a 1060 as the base requirement, you can generally still run these programs on a 980 TI on low settings and be fine.
If you stick with one of these cards and the patched XP drivers, you'll have no trouble booting Windows XP and Windows 11 from this one centralized GPU including full amenities like high refresh rates and resolutions.
The downside is that the advent of RTX / raytracing and revolutionary chipsets since then have become increasingly mainstream. Feature of these newer cards are now being baked into many new releases. I have found that a 20-series card is a much better "middle of the line" GPU these days as it supports a more mature level of RTX than earlier renditions but is also notably cheaper and more obtainable than the 30-series, with pretty good benchmarks all around and much improved potential for VR. But again XP will be unable to embrace hardware acceleration of these cards. Keep reading for a nice compromise.
OPTION 2: Use Barebone VGA or VBEMP as a Subtly Improved Driver for Unsupported Cards (...but this will be a struggle for most games or intense usage.)
 Even though modern GPUs are unsupported by XP, they will still fall back to a default VGA driver to provide you with bare essential usability. In fact, the default VGA driver when you have no proper drivers installed will still generally allow you to switch to high resolutions and is acceptable for basic productivity-related tasks. You could stick to just the bare integrated driver if your primary reason for using XP is just to access particular software that doesn't rely too much on hardware or visuals. You can also adjust Performance Options to better enhance the experience even without any drivers, such as disabling "show contents while dragging" (which may otherwise be very sluggish) as well as disabling animations and visual styles. I've found a lot of the performance options can actually be left on and not really hinder the performance any further, but for sure the animation effects and content dragging options should be disabled.
A subtle upgrade to this would be to check out VBEMP, a "Universal VESA/VBE Video Display Driver" designed to enhance bare bones VGA rendering on cards without proper drivers. This driver modification is particularly helpful for Windows 95/98 but also has variants to support Windows XP and Windows 2003 architectures. You can find some specific tricks to VGA optimizations for XP using this driver here. In preliminary tests, I found that utilizing a VBEMP based VGA driver with my 2070 or Intel 4600 graphics did have a small bump in performance including the ability to drag windows without lag. However, you should understand that these drivers offer no hardware accelerated support and are intentionally generic and base level in features to accommodate the largest set of GPUs, but also largely targets vintage GPUs from decades past. (A package of older VBEMP releases exists on Archive.org but the latest releases from the developer operate on the donationware model).
If you stick to just VGA/VBEMP, you can enjoy the modern luxuries of gaming and applications on Windows 11 while still have access to the XP partition for basic tasks or simple Windows games (Pinball runs fine, too!)
OPTION 3: Use your Motherboard's Onboard Video as Alternate Inputs (...but modern motherboards will likely lack XP drivers.)
 Many motherboards include some variant of onboard video, these days including HDMI and DisplayPort out. Although performance can't compare to dedicated GPUs, the later versions of onboard graphics including Intel's 4000-series still prove adequate for a lot of XP-era gaming and will be leaps and bounds better than VGA with no driver at all. Intel supplied official XP drivers for its Ivy Bridge line including onboard GMA HD, HD 2000, HD 2500, HD 3000 and HD 4000 GPUs. You can also often find alternative drivers at specific computer support sites like Dell for particular configurations.
Unfortunately, support got a lot more sparse for Intel's Haswell line of CPUs and graphics including HD 4400+, with no formal XP support for the vast majority of hardware configurations. There does exist a specialized and obscure subset of drivers meant for embedded machines running the specialized POS version of Windows XP (POSReady2009), but it is a coin toss as to whether it will work for your particular configuration or result in a catastrophic BSOD. (The links are gone from Intel's site but you can find backups here: 32-bit | 64-bit | Release Notes) These drivers for Haswell graphics were even tested using Doom 3 and the release notes are quite interesting. While it detects my Intel HD 4600 (as a GT2) and I can get it through the install process, my configuration leads to a BSOD and has to be reverted.
If you can find compatible drivers for your onboard GPU, you can enable it on XP and get a lot more power and hardware acceleration than you would using the native VGA driver, but it still can't compare to a dedicated GPU.
If you are considering experimental drivers for onboard video, make sure to utilize the Restore Point feature of XP to create a manual restore point before installing. You can then revert back via Safe Mode if need be. Typically even if you get an XP BSOD after installing Intel GPU drivers, you will be able to boot into Safe Mode and uninstall the drivers from there. I did not spend a lot of time deciphering or altering the Intel-provided Haswell drivers for embedded machines, because frankly this route still would result in very sub-optimal GPU performance compared to the much more stable option 4 below.
Assuming your GPU has working driver support for XP, you'll want to disable the onboard GPU within Windows 11 through its Device Manager and, conversely, disable the non-compatible dedicated GPU from XP's own Device Manager. This way each operating system will only actively be using one GPU interface or the other, although in Windows 11 you could use both GPUs at the same time for added display outputs if so desired. Personally I find the use of multiple active GPUs can easily become confusing for games and applications unless you are intentionally using a dedicated SLI/CrossFire setup. Obviously you will then want to run additional video cables from the onboard port(s) to alternate inputs on your display(s). This way you can select the necessary inputs depending on your OS to view either system without having to constantly reroute wires.
OPTION 4: Use a natively supported GPU for XP, and a more modern one for Windows 11 (...this is the best path forward.)
 After exhausting all the options above, my own personal recommendation is this. Many motherboards include three PCIe x16 slots, but almost all will have at least two. In my opinion singular cards like the RTX 20-series are perfectly capable for any modern use as-is, with no drastic benefit of SLI. This means that there will often be at least one free PCIe slot capable of accepting a second GPU.
You can grab any XP-capable video card, AMD or NVIDIA, and pop it into another PCIe slot. They even make some single slot, PCIe 2.0 cards like the GT 710 that can fit in any of your PCIe slots with minimal footprint. Pretty much every card from the 900-series down to 200-series will still give you a respectable XP experience complete with hardware acceleration. I had an extra GTX 680 circa 2012 that is perfect and plenty powerful for any XP-era video games and well beyond. One word of caution about single slot budget GPUs...many of them may have a fixed fan speed and can end up sounding quite loud when running with no easy way to disable it when not in use. I experienced this with a GT 740 and concluded the GTX-680 was actually more efficient and sustainable going forward.
To ease concerns that this setup may diminish the performance of my main GTX 2070 Super card, I ran comprehensive 3DMark 2021 and PCMark 10 tests with and without the GTX 680 connected. The scores were identical in both cases, there was no loss of performance at all. Some motherboards may have varying grades of PCIe in which the top slot may be x16 but the lower slots are x8 or x4. I'd recommend checking your motherboard specs — my MSI z97 Gaming 7 motherboard features 3x PCIe 3.0 x16 slots (support x16, x8/x8, x8/x4/x4 modes) and in the BIOS I have configured PEGX to Auto. Even if you have a board containing only one x16 PCIe slot, running an XP-compatible card at the lower x8 or x4 slot speeds will generally not be a noticeable difference in performance. We aren't dealing with SLI, just two independent cards to power two operating systems from the same machine.

As far as power consumption, testing the configuration with and without the second GPU installed while monitoring KWh/Voltage/Amps through a Kill A Watt also proved negligible. When idling in Windows 11 with just one GPU, I was reading 142-146 volt amps, 1.2 amps and 130 watts. With the second GPU installed it was a median difference of +6 volt amps, +12 watts and 0.06 amps, or approximately 2-4% increase in power mostly to keep the GTX 680 fans spinning on low. It I was extremely particular I could disable the fans on the secondary GPU through Precision X or Afterburner in Windows 11 but I don't mind the silent fans spinning to keep things a little cooler internally.
With my dual/triple display setup, I was able to run DisplayPort/HDMI/DVI cables from the GTX-680 to alternate unused inputs on the various displays. The GPU required two of the six-pin GPU power connectors, which my modular PSU had no trouble with as an extra cable. Then it is as simple as switching the display inputs depending on if I'm in Windows XP or Windows 11. Depending on the cable connection and GPU used for the XP install, you should be able to embrace high refresh rates and resolutions without any trouble. Note that XP was not particularly well-built for dual monitor displays, so it can take a lot of trial and error to get things configured correctly and you should be doing so through your GPUs own software configuration rather than Microsoft's own Display Properties. Realistically I will likely revert back to a single connected screen for XP since it suffices perfectly for my uses, and I have 2-3 other systems already connected to other inputs.
Sound Card Support for XP
 When I completed my Windows XP and Windows 10 dual boot setup, I was using an ASUS Xonar DX 7.1 channel sound card. Although it is an older chipset, it offered perfect support and drivers for XP and Windows 10/11 including through the unofficial UNi Xonar Drivers pack. I found the quality of sound perfectly acceptable and generally indistinguishable from higher end modern cards. At some point the card got zapped from electrostatic through a line and damaged it. I made the upgrade to a Sound Blaster AE-7 for improved front panel mic/headphone input and other modern benefits. But Sound Blaster hasn't provided XP drivers for many years of products. Rather than exhausting weeks trying to patch drivers to work with this sound card for XP, I opted for one of two alternative solutions:
- Use HDMI Audio. If you have a monitor that supports HDMI audio throughput, this may be the cleanest solution. Many monitors have integrated sound-over-HDMI and audio out for external speakers or headphones. My LG Ultragear monitor supports both. After installing NVIDIA drivers for my GTX 680, I was able to select NVIDIA HDMI Audio from my sound options and have sound direct to the monitor, which I subsequently have external speakers attached to. This setup is one that I had prior to this project as I use this approach while connecting secondary systems to my monitor as well.
- Use Onboard Audio. Most modern motherboards still include some variant of Realtek HD audio including 5.1 and optical/digital out. Although motherboard manufacturers may not supply XP drivers directly through their website anymore, you can still track down compatible drivers through the audio chipset manufacturers themselves. I was able to find Realtek HD Audio 2.72 installation package compatible with Windows XP 32-bit, and installing that enabled the full range of onboard audio and configuration options. The benefit of this approach is I can then connect my dedicated 5.1 surround speaker system with subwoofer and experience the same audio fidelity as I do in Windows 11. I have a Logitech Z906 Speaker System and it accepts various optical and analog inputs with a simple switch to toggle between them. I have my Windows 11 AE-7 running through 5.1 analog cables (personal preference, could use optical) and my Windows XP Realtek HD running through an optical cable. So again, it's a single toggle to switch between the audio devices.
As with the GPU setup, you may wish to disable the unused sound device within each operating system. Also you'll obviously need to enable onboard audio if using option 2 above.
USB 3.0 Support for XP
One prevailing issue with getting Windows XP to cooperate on modern machines is its lack of USB 3.0 support. Or, more broadly, a lack of chipset drivers for many modern USB controllers. You can determine if this will be a problem for you if you have a keyboard/mouse hooked to integrated USB ports and are unable to use them when booting the Windows XP installation disc. I would recommend attempting this process several times with them plugged into different ports on your motherboard, since often there are multiple USB chipsets used and some (especially USB 2.0 variants) may still be picked up by XP especially if burning the SP3-integrated version or with other custom slipstreamed drivers.

As was the case in determining the SATA chipset drivers to slipstream, a good starting point is to research what USB chips are installed in your motherboard. This can be done by reviewing the manual's detailed technical specs and Device Manager properties for any USB Host and USB Root Hub devices listed. Review of my configuration found "USB\ROOT_HUB20&VID8086" (Intel USB 3.0 Hub), "USB\ROOT_HUB30&VID1912" (StarTech / Generic Card Reader with USB 3.0), "USB\ROOT_HUB30&VID1B21" (ASMedia USB xHCI / Root Hub) and "USB\ROOT_HUB30&VID10DE" (NVIDIA USB 3.1 eXtensible Host) and "PCI\VEN_8086&DEV_8CB1" (Intel 9 Series Chipset USB xHCI).
If your motherboard supports a PS/2 port and XP is not able to pick up USB functionality for installation, you can plug in a traditional PS/2 keyboard (or with USB to PS/2 adapter) and use the keyboard to proceed through installation. Then you can continue the pursuit of USB drivers once it has been installed by reviewing the missing drivers in the Device Manager and scrounging around to find the necessary drivers. If you followed the SATA integration steps described earlier to incorporate AHCI / SSD capabilities, chances are that at least some of the onboard USB ports will already work for you once you boot into the XP installation screen. I had no trouble using a USB mouse and keyboard during the installation process with my configuration and custom XP installation disc, but still kept a PS/2 keyboard connected just in case I lost USB connectivity throughout the process.
If all else fails, I have found that third party USB adapters can be a great way to bring USB 3.0 support to XP. I picked up a SupaHub USB-C and USB 3.0 PCI Express Adapter last year. However, the company behind it and listings on Amazon and NewEgg have vanished. On Windows 11 it detects automatically using a Renasas USB 3.0 eXtensible Host Controller driver by Microsoft. Comparing hardware IDs I stumbled across a driver on Rosewill's website for "RENESAS USB3 Host Driver 30230" which wound up being 100% compatible with this adapter and XP. I have my main keyboard and mouse plugged into a USB switch, which I use as a KVM to toggle between several other systems I sometimes have running on my monitors. This is then plugged into the USB 3.0 adapter and works fine on boot for both XP and Windows 11. But it is still preferrable if you can get the onboard USB ports to function in XP so that you can easily use the devices even during POST, before any OS loads.
Boot Oddities with Select USB Drivers and XP
There can be some peculiar problems that arise when you first boot from Windows 11 back to Windows XP depending on your USB drivers, motherboard chipset and connections. In the past (including with Windows 10) I found that rebooting into XP would not properly initialize the USB controllers until XP was rebooted a second time. Something would get stuck in the driver process and not fully reset itself when coming directly from the modern OS and bootloader. I do not experience this problem presently with my existing configuration and while using the legacy bootloader described in my original tutorial. I also am using the USB adapter rather than on-board USB. None-the-less, I will detail my automated solution to this for the sake of completeness if it happens to you.
Since I discovered that the USB devices would not activate during the first boot coming from Windows 11, including if using the convenient iReboot sequence described in my original guide, I needed to come up with a way to force-reboot one time if the previous launch was for Windows 11. I brainstormed a simple counter that would track how many times Windows XP has been booted since Windows 11 last was, and if it had only occurred once then it would force reboot once to ensure the drivers properly instantiate. From there, I created some batch file experiments to put my plan into action.
After quite a few variants, a simple adaptation for the XP instance ("RestartManagerWINXP.bat") was:
|
1 2 3 4 5 6 7 8 9 10 11 12 13 14 15 16 17 18 19 20 21 22 23 24 25 26 27 28 29 |
@ECHO OFF SET RestartFlagFile=%~dp0RestartFlag.dat IF NOT EXIST %RestartFlagFile% ( ECHO 0 > %RestartFlagFile% ) :FileCheck IF EXIST %RestartFlagFile% GOTO FlagCheck GOTO FileCheck :FlagCheck echo Waiting echo wscript.sleep 1000 > wait.vbs wscript.exe wait.vbs del wait.vbs set /p RestartCount=<%RestartFlagFile% set /a RestartCount=RestartCount+1 REM IF %RestartCount% GTR 1 ( REM set /a RestartCount=0 REM ) ECHO %RestartCount% > %RestartFlagFile% IF %RestartCount%==1 ( bcdedit /bootsequence {ntldr} /addfirst Shutdown /r /t 10 /c "Rebooting to fix USB Initialization" ) |
This script will check for the presence of "RestartFlagFile" which is a simple file counting the number of times XP has booted. If the file does not exist, it will create it. As soon as the file exists on the drive, it will read the value of that file (0 by default) and add one to it. If the restart count is equal to one, I use the BCDEdit command to set XP as the first boot device and then issue a restart command — depending on your particular boot arrangement and configuration you may need to adjust that line. (The remarked out lines were from an earlier iteration designed to reset the count after it had been restarted once, to prepare it for the next time. I realized there were pitfalls with this approach and a more logical approach was to just continuously increment the value and then delete the file to actually reset it from within Windows 10/11 instead. I also stick a one second sleep delay into the midst just so the file reading doesn't happen instantaneously.)
From there I made a simple batch file for Windows 11 to check for that file and delete it if found ("RestartManagerWIN11.bat").
|
1 2 3 4 5 6 |
@ECHO OFF SET RestartFlagFile=%~dp0RestartFlag.dat IF EXIST %RestartFlagFile% ( DEL %RestartFlagFile% ) |
I created shortcuts to each respective script and set the shortcut properties to "Run as Administrator." The "RestartManagerWINXP.bat" was added to the "Startup" in XP, and similar for "RestartManagerWIN11.bat" for Windows 11. This is achieved in XP by simply copying the shortcut to the Startup folder on the start menu, and in Windows 10/11 it is done by entering "shell:startup" in the Run dialog and then copying the shortcut there. Now rebooting to XP the first time from Windows 11 will force a second reboot automatically to re-initialize all devices and drivers. I added a 10 second buffer and warning to this script so that if needed it could be canceled before a reboot.

Again, none of this is currently an issue with my dual setup but was at some point in the past so I created this workaround. If you stick to an external USB adapter for your keyboard and mouse or verify correct functionality of the integrated USB controllers, this shouldn't be a problem for you either and no need for these scripts.
Post-Installation Patches

Microsoft's Service Pack 3 was the last official cumulative update pushed out for Windows XP 32-bit. There have been some great community bundles since then that enable you to quickly apply the rest of the updates XP, rolled up into what is dubbed the unofficial Service Pack 4. The best all-inclusive solution is via Harkaz's packs. To start, you can grab the base v3.1b SP4. Installing that will apply a large set of system updates on top of the existing SP3. A separate post-SP4 rollup is also available from Harkaz including additional patches important to ensure your system as as current as XP can be. There are many approaches to applying all of these updates depending on whether you already have .NET installed or not and whether you wish to include these updates in a slipstreamed version of the installer. I opted to install the basic SP3 as a start, then manually installed the various .NET updates and components, and then applied these final SP4 updates.
Finally, these days there will be all sorts of SSL certificate and encryption errors trying to do most things from XP. Thankfully the patchwork required to resolve this can be automated by running Heinoganda's excellent Root Certificates and Revoked Certificates Updater. With all of this applied, Windows XP should be in the most stable state it can possibly be in the year 2021.
Scan Disk "Checking File System" Woes

A dual boot setup in this manner — with two distinctly different operating systems separated by 20 years of time on a modern SSD — is ripe for trouble with the dreaded disk scanning checks that can appear on boot. It can be especially agonizing if you have multiple large hard drives and they get flagged for scanning, whereby you are unsure if it'll take 10 minutes to scan or all night. These scans get flagged if a drive's "dirty" bit is set, which can occur after BSOD or unexpected shutdowns The best way to prevent these disk checks from occurring is to ensure that you always shutdown both operating systems properly through the Shutdown option. When this occurs you may find the scans occur on both the XP and Windows 11 partitions and one or more drives may get stuck in a perpetual scan check cycle each time you boot even after letting them complete successfully.
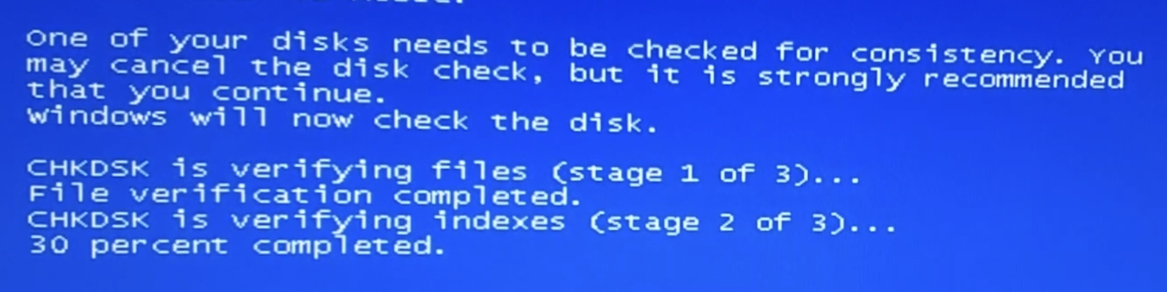
The scan disk utility of Windows XP was built around old IDE hard drives and is probably not ideal to have running too frequently on modern SSD and SATA counterparts. My personal recommendation, once you have both operating systems up and running, is to disable drive scans on the XP side with each boot. This can be done by creating a startup batch file using the "chkntfs" command with varying parameters. For example, to remove the check on my physical hard drives I created a batch file containing the line: "chkntfs /X C: D: F: G:" - You will have to make sure each drive you specify is a physical drive that XP can see or the command will error out. This will exclude these drives from scan on reboot. This command can also be applied to your Windows 11 instance, but I prefer to let that one stay.
Again, it should be very rare that you'll ever see a disk scan if you properly shutdown every time, and the method described above should only allow Windows 11 to correct any dirty bits or scan drives. The entire topic of the perceived usefulness or destructiveness of these scans on modern hard drives has a lot of discussions online, which I encourage you to research if interested.
Software
 It's not always easy finding legacy-compatible software products for modern uses. All major software developers have long removed XP versions of their products and use of old versions (especially obsolete browsers) is generally discouraged. My recommendation is to handle the software piece on an as-needed basis, rather than attempting to find bundles and packs that may contain a bunch of irrelevant or questionable programs you have no practical use for. Here are a few notes and recommendations from my own experience:
- Web Browser: Google and Mozilla have long killed off their XP-compatible line of browsers. Serpent/UXP (Basilisk) is my recommended browser for XP. Actively maintained with regular updates and detailed change logs, 32-bit and 64-bit availability. Derived from Firefox with plugin support. MyPal Browser is in similar vein, unfortunately there has been recent licensing controversies, and future updates are not expected.
- Office Software: Apache OpenOffice remains compatible with Windows XP, including its latest version. This provides strong compatibility with Microsoft Office documents.
- Extraction Software: 7-Zip is free and supports Windows XP, and conveniently opens all popular compressed formats including .zip, .7z, .rar and many more.
- Steam: Official support was dropped by Valve at the end of 2018. There are still roundabout ways to get it functional as a launcher in XP, but it requires copying files from a modern logged-in instance (such as on Windows 11). The best tutorial on getting it up and running in 2021 is from this video, which I have verified is still working as of September 2021. That said, my own recommendation is to download/install games from your Windows 11 instance of Steam and see about copying over or accessing the raw game contents from XP afterward. This should work sufficiently for many DRM-free and standalone games that aren't directly tied to Steam.
- Screen Capture: OBS doesn't support XP. Traditionally, Fraps was the go-to program at least for recording full-screen gaming albeit as uncompressed video. I happen to have a physical copy of Camtasia Studio 6 that I won at a Microsoft event years back that works great in Windows XP for desktop-based capturing (used copies can be found on eBay for around $30). For screenshots instead of videos, Greenshot is great for all flavors of Windows. FastStone Capture is another to consider for screen capturing needs.
- Music: It is possible to run Spotify without trouble if you grab the legacy Vista build of it, including sign-in and premium streaming. My dedicated music player of choice had long been WinAmp, superseded by AIMP but now I find MusicBee (link goes to last XP-compatible build) to be an attractive and versatile option.
- Video: The most lightweight and efficient player is Media Player Classic (version 1.7.13.32 is the last XP-compatible build for 32-bit and 64-bit). While you are at it, grab the last XP-compatible version of K-Lite Codec Pack Basic (13.8.5) which will bring support for modern codecs including MP4. VLC Player 2.0.2 is a solid version for XP, as well.
- Audio Recording: I have a Scarlett 2i2 audio interface. Modern drivers are only available for Windows 7 and above. However, Focusrite 2.5.1 retrieved from Archive.org installed successfully. As far as software, Audacity is a popular freebie with version 2.0.6 supporting XP, and others may still be compatible as well.
- Graphic Design: Gimp has been a longstanding free graphic design tool, with version 2.8 officially supported on XP. A very old version of Krita 2.8.1.1 may also be of interest. An online Photoshop-like editor also exists, Photopea, and should run adequately on the XP browsers mentioned above.
- Windows Live Essentials: When Vista emerged, some of its "Windows Live" based programs were well received. An XP-compatible version of Live Essentials was released and is available on Archive.org. I recommend installing Photo Gallery and Writer from the installation, and you may optionally still find value with Mail. As an alternative photo gallery viewer, consider IrfanView or FastStone Image Viewer, both of which still support XP.
- Security: We've reached the point where the usage of XP is so minimal (1%) that few malware writers would want to waste time targeting such an OS at this late stage. That's not to say exploits don't exist and vulnerabilities may still carry over to it. The built-in firewall is quite unobtrusive and easy to allow or deny traffic when needed. SpywareBlaster is convenient to apply after a fresh install as it applies blocks to known malicious cookies and URLs without consuming any processes after the lists have been applied. As far as active virus scanning, ClamWin is the preferred choice for XP with frequently maintained definitions and updates.
The list above should be a great foundation at getting an XP install functional to the best of its ability some two decades after its release. You can find other lists of programs elsewhere, such as AllXPSoft.com. With any software you download online especially from aggregate re-hosted websites, I highly recommend that you submit the downloads through VirusTotal.com to check their integrity before installing on your XP machine.
Good Night, and Good Luck!
Although this exercise is admittedly quite a novelty at this point, I hope that this guide along with my prior ones about XP will help guide you through some of the biggest obstacles. Any questions or corrections feel free to write! For now, I'll still enjoy the occasional retreat back to XP, when times were simpler...
Hey Matt, thanks for the interesting post! I'm running an old AMD FX PiledRiver system, dual booting Debian Bullseye for normal usage and Windows XP for old games that I want to run with hardware-accelerated EAX / DS3D audio. Performance is great with my 980ti.
However, lately I've been playing with a qemu / kvm WinXP VM with hardware passthrough of a Radeon 7750 (in the second PCIe x16 slot), a legacy PCI Audigy 2 ZS and USB devices as needed.
CPU performance is noticeably slower than a bare metal install, but it's fine for playing old games (D oom 3, Half Life 2, Star Wars KOTOR, Need for Speed Porsche etc). Your 4790K would have much more performance to spare than my FX-8320.
My thoughts are that with it getting harder and harder to run XP on bare metal (my next system will not be able to), virtualisation with hardware passthrough (egg via qemu / kvm / vfio-pci) is the only way forward. Have you ever tried this?