


This is the second of a four-part story documenting my somewhat excruciating and wholly uncharted experience developing an indie game for Panasonic’s obscure VIERA Connect television app market.
In the first part of this postmortem, I detailed the pains of becoming a VIERA Connect third party developer and struggles of setting up the rigid development environment required by Panasonic. Now I turn my attention to the actual development process using the company’s available API.
...Time to Make My Game

Apple Muncher Title Screen
The idea for my game was simple—I wanted to recreate the classic snake game for compatible Panasonic televisions and Blu-ray players. My first encounter with this type of game was in the early 1990s via Microsoft QBasic, which included a sample application known as Nibbles.
The plot is as simple as it gets: collect items placed randomly on the screen and avoid crashing into barriers or your ever-growing self. The ‘snake’ genre was heavily popularized by early flip-style cellphones, many of which included such a game preinstalled to the thrill of bored people everywhere.
To add to the game’s addictive qualities and replay value, I decided to implement a few core features:
- 25 unique and increasingly difficult levels
- Five graphical themes to change the overall look and feel
- An online score system to increase competitiveness
- Several collectibles including different colored apples and extra lives
The player would start as a tiny snake and would grow so many units with each collected fruit, depending on the flavor of apple eaten. As the user progressed through each level, the base speed of the snake would also steadily increase. After some consideration, I decided to call my game Apple Muncher. [An early working title was Nibblify—derived from Nibbles and my first iOS app Scribblify.]
Hello Ajax-CE
 During the time that I was actively enrolled in Panasonic’s developer network, the only API available to non-partner developers was what Panasonic dubbed Ajax-CE. As detailed in the first part of this series, I was unable to view any part of the API before ponying up nearly $130. At some point after my development stint, Panasonic enabled free registration for users to review the API documentation before committing to the platform. Alas, with the promise of JavaScript-driven development, integrated 3D functionality and rich GUI libraries, I blindly approached the platform with a lot of hope.
Within minutes after skimming over the API documentation, my aspirations for the platform as a third party dwindled. It was immediately apparent that the partner apps on the VIERA market, including the stunning Asphalt 5 racing game from GameLoft, were not developed using the toolkit I was supplied with.
The JavaScript-based API was, in fact, a highly restrictive subset of commands tied to proprietary Panasonic object methods. It was impossible to output any HTML elements or CSS styles. The underlying concept of the API revolved around “Stages," with each stage representing a particular screen or interface. A stage is represented as a JavaScript object with a handful of methods (i.e., an event handler for detecting user input, in/out transitional methods) and some properties (i.e., an array for housing media assets, a background image declaration).
The code required to display Hello World on the screen using Panasonic's Ajax-CE, simulated in the screenshot above, is as follows:
|
1 2 3 4 5 6 7 8 9 10 11 12 13 14 15 16 17 18 19 20 21 22 23 24 25 26 27 28 29 30 31 32 33 34 35 36 37 38 39 40 41 42 43 44 45 46 47 48 49 50 51 52 53 54 55 56 57 58 59 60 61 62 63 64 65 66 |
// Initialize a stage object var sobj = stage ({ "symbol": appli_symbol + "_main", // Strage transitions in "in": [ { "from": ["default"], "hook": function(obj) { complete_on_stage(obj); } }, ], // Stage transitions out "out": [ { "to": ["default"], "hook": function(obj) { complete_off_stage(obj); } } ], // Watch for key presses "key_hook": function (up_down, key) { if (up_down != KEY_PRESS) return false; switch (key) { case TXK_RETURN: exit_appli(0); return true; } return true; }, // Simple dark-blue background "bg_image": [ new gbox ({ "width": 1920, "height": 1080, "color": [0, 0, 64, 255], "translate": [0 ,0 ,0] }) ], // Media assets "components": [ // Text object for outputting Hello World new gtextbox ({ "translate": [0, 0, 0], "width": 1200, "height": 400, "text": "Hello World!", "font_size": 240, "color": [0, 255, 0, 255], "align": CENTER }) ] }); // Call the Application Ready function to start app ready_appli(); |
For Apple Muncher, I would require three stages (equivalent to three screens in a typical app):
- Title Stage: The initial stage where the user can set options or start a game.
- Game Stage: The heart of the app where the user actually plays the game.
- Score Stage: The list of high scores with some basic filtering options.
Interface Design
As a traditional Web programmer, I was accustomed to loading in media assets and manipulating interface components using the standard HTML/HTML5 Document Object Model (DOM), CSS styles and JavaScript properties. Since Panasonic’s Ajax CE does not support HTML documents or CSS, you cannot simply load up an image or generate text in the usual way. Instead Panasonic provides a custom means of creating a few basic media types:
- gbox: A class for creating basic rectangle shapes
- gtext: A class for creating basic single-line text labels
- gtextbox: A class for creating multi-line text boxes
- gimage: A class for displaying image-based media
These components are instantiated in the usual way of creating a new JavaScript objects. Each type supports a number of properties to control position and appearance. For example, when the snake eats an apple in my game and it needs a new body segment, I perform the following function to load in and position a new body segment image:
|
1 2 3 4 5 6 7 8 9 10 11 12 13 14 15 16 17 18 19 |
// Append new body node to playerBody array playerBody.push ( // Create new gimage object containing body node image new gimage ({ "translate": [player.oldx, player.oldy, 0], "rotation": [player.direction, 0, 0, 1], "src": "images/themes/" + game.theme + "_" + playerTurnImg, "width": player.size, "height": player.size, "visible_p": true, "color": [game.color[0], game.color[1], game.color[2], player.alpha], "draw_type": INSCRIBED }) ); // Add new body node to stage components array to display on screen mstage.components.push(playerBody[playerBody.length - 1]); |

Apple Muncher Gameplay Screenshot
In the snippet above, I push a new gimage object into the playerBody array (defined earlier) to extend the player’s body length. Depending on what type of apple has been eaten, this function may be repeated several times to add numerous new segments. The properties used for the gimage instantiation behave as follows:
- translate [X, Y, Z]: Positions the new body segment at the player’s previous x/y coord. This puts it where the head of the player was in the last frame, so new body segments descend from the head.
- rotation [ANGLE, X, Y, Z]: Rotates the image the specified angle in degrees. You specify which axis to rotate around by designating ‘1’ in the pertinent area. I rotate the new body image so that it is the same direction as the player’s head so that it seamlessly blends with the rest of the snake.
- src: The path of the image to use. To support basic themes in my game, each graphic is prepended with a number corresponding to the theme. I create the source path by concatenating the selected theme with the requested image. Sometimes the player may turn as they collect an apple, whereby a ‘turn’ body image is loaded, while other times a ‘straight’ image is necessary. I determine this prior to this function and store the image name in the bodyImg variable (i.e., “turn.png”).
- width/height: The dimension of the gimage, in pixels. In this case I use the size defined in the player object so that it matches the scale of the head.
- visible_p: Sets the gimage to be visible on the screen.
- color [r, g, b, a]: The color to tint the image. With all values set to 255 the image will be its original color. The images I created were grayscale so applying a tint of 255, 0, 0, 255 will give it a full red tint. In the ‘plasma’ theme of the game, the color of each new body node is cycled, so I adjust the color values before adding this node and retrieve the RGB values from an array.
- draw_type: This value of this property determines how the loaded image will scale if the width and height differ from the loaded image resolution. Inscribed will stretch the image to fit the specified width or height while preserving the aspect ratio. Circumscribed clips the image to the specified width and height while still preserving the aspect ratio. Direct will simply scale the image to the specified width and height regardless of aspect ratio. In my case the image is the same resolution as the size specified so it makes no difference.
After the gimage is created for the new body segment and pushed to the end of the playerBody array, I then push it to the components array of the main stage class. This is needed to actually render it to the screen. There are a couple other operations available in a gimage object including a ‘flip’ property to mirror the image horizontally or vertically, and an onload callback function that is triggered as soon as the image has loaded (which I use to track what images have loaded; ones that haven’t loaded after a certain time are requested a second time). You can revise these properties after the image has been created to move it on the screen, rotate it and so forth.
I use gimages for all of the graphical elements in the game, gtext/gtextbox objects for the score labels and high score charts and gbox for the preloader background. Due to the limited customization options available for text objects, I opted to create custom menu options using graphics instead. I also had to create a custom on-board keyboard for accepting user input for high score entry, given the lack of any native input field options available through the Ajax CE API.
Mind-Numbing Sound Effect Limitations
Panasonic's Ajax-CE Software-imposed Sound Limit
Despite feeling that the available graphical feature-set was quite imposing and cumbersome to work with, I was still optimistic that the audio support through the API would at least be solid. After all, this was a top-end 1080p smart television line with built-in apps that could stream 5.1 surround audio. The integrated speakers themselves support up to 48 kHz LPCM audio. The audio of Asphalt 5 sounded great through the machine as well. Yeah, right!
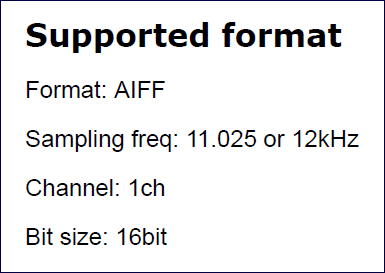
The Ajax-CE third party API in fact restricts audio formats to a jaw-dropping degree. Specifically, the only supported audio format is 16-bit AIFF, 11.025kHz to 12kHz, mono! I hadn't come across such a harsh audio restriction since the earliest console days. None-the-less, audio wasn't a particularly big point in my game but I was still taken aback by this software-imposed restriction when the television was capable of so much more. For Apple Muncher, I created two music loop files (Title, Game) and about six sound effects (Menu Toggle, Menu Confirm, Item Collect, Level Up, Death, Countdown).
The available audio command set is also scant. You can do precisely three things with audio through the API: load a sound file into an indicated slot, play it (up to nine sounds simultaneously), and mute sounds globally. There is not even an option to stop a sound prematurely, nor one to loop a given file. To achieve looping music, it becomes necessary to run a timer for the precise millisecond length of the music file, then request to play the music again when the time has elapsed, infinitely. I had to implement some other inconvenient functions to appropriately switch between the two background music tracks I included, but below is a simple demonstration of essentially how I looped the main game background music.
|
1 2 3 4 5 6 7 8 9 |
// Load main game music system.effect_sound.set_sound(1, "game-music.aiff"); // Loop main game music system.effect_sound.play(1); append_timer(playerId, 6808, function(obj, count) { system.effect_sound.play(1); } |
Due to the comparatively large file size of raw AIFF files even at such a low fidelity, coupled with the fact that sounds cannot be stopped once they begin playing until they reach the end, I kept the music loops down to just two seconds for the title screen and six seconds for the game.
Level Design
Not wanting to do any more coding in the Ajax-CE platform than I absolutely had to, I decided to craft my entire level editor as a macro-powered Excel spreadsheet. Within the spreadsheet, I would fill in cells with certain colors to depict certain elements in the map. Red/Orange indicated walls and wall edges, green indicated the player start position. The number inside the player start cell instructed the app what way the snake will be traveling when the level starts. Each level had a configurable amount of total apples needed to progress, as well as a base speed for the map and how much faster the snake would go per apple eaten.
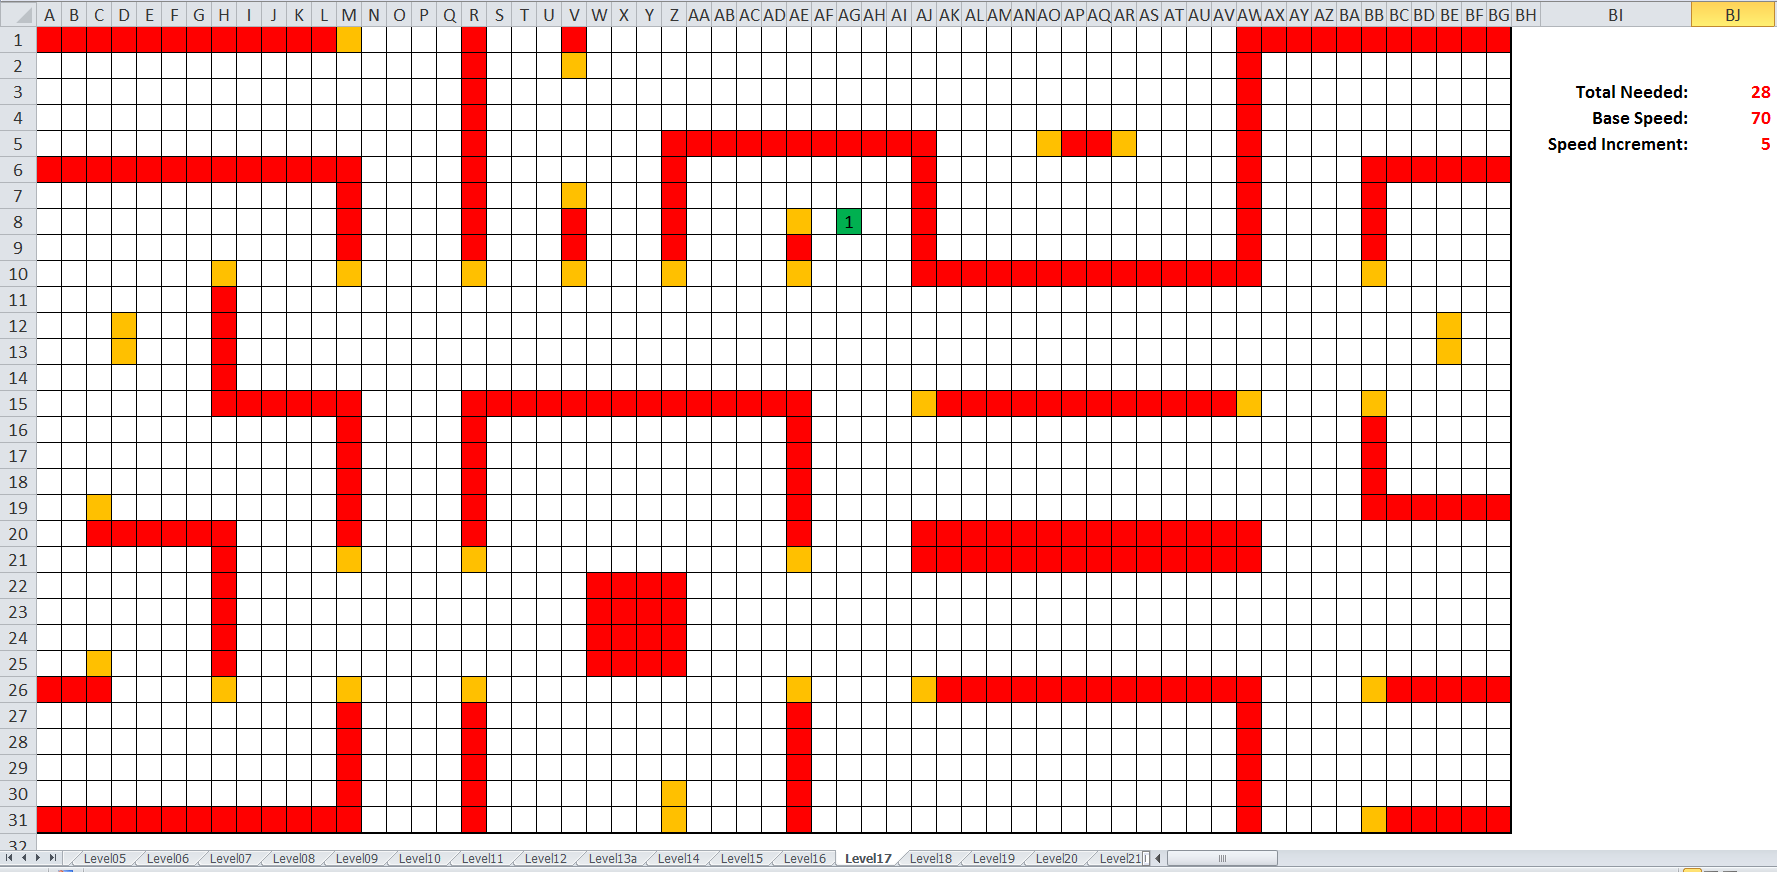
Apple Muncher Level Editor (Spreadsheet)
To generate the level data, I wrote a VBScript macro that parses all of the cells. The script analyzes the walls and wall edges to determine what type of wall texture to place in the game to save from having to calculate any of that inside the Ajax-CE script itself. Before recording the wall data, the macro locates the player start position and records those coordinates along with the other vital level data.
|
1 2 3 4 5 6 7 8 9 10 11 |
For Each c In Worksheets(ThisWorkbook.Name).Range("A1:CK47").Cells If c.Interior.ColorIndex = 14 Then levelData = "levelData.push (" & _ c.Column - 1 & ", " & _ totalRows - (c.Row - 1) & ", " & _ c.Value & ", " & _ totalNeeded & ", " & _ speedIncrement & ", " _ & baseSpeed & ", " End If Next |
You notice that I store all of the parsed data into a string that starts with levelData.push (. After analyzing data about every cell in the level and appending the results to this string, the string is closed and written to a new text file using the following code:
|
1 2 3 4 5 6 7 |
fname = (Left(ThisWorkbook.Name, Len(ThisWorkbook.Name) - 5)) & ".txt" levelData = Mid$(levelData, 1, Len(levelData) - 2) & ");" DataFile = ActiveWorkbook.Path & "\levels\" & fname fnum = FreeFile() Open DataFile For Output As fnum Print #fnum, levelData Close #fnum |
The end result is a text file that contains a single line ready to be pasted into the Apple Muncher source code, appending the data as a new element in the levelData array. It isn't something meant for public viewing or deciphering and the whole line looks like:
|
1 |
levelData.push (29, 3, 0, 28, 5, 70, 134, 2027, 125, 2327, 106, 2127, 107, 2127, 108, 2127, 109, 2127, 1010, 2127, 1011, 2127, 1012, 2127, 1013, 2127, 1014, 2127, 1015, 2127, 1016, 2127, 1017, 2127, 1018, 2127, 1019, 2127, 1020, 2127, 1021, 2127, 1022, 2127, 1023, 2127, 1024, 2127, 1025, 2127, 1126, 2327, 1132, 2127, 1033, 2127, 1034, 2127, 1035, 2127, 1036, 2127, 1037, 2127, 1038, 2127, 1039, 2127, 1040, 2127, 1041, 2127, 1042, 2127, 1043, 2127, 1044, 2127, 1045, 2127, 1046, 2127, 1047, 2127, 1048, 2127, 1049, 2127, 1050, 2127, 1051, 2127, 1052, 2127, 1253, 2327, 1354, 2327, 124, 2026, 135, 2226, 1353, 2126, 1254, 2226, 104, 2025, 1054, 2025, 104, 2024, 1054, 2024, 104, 2023, 1054, 2023, 104, 2022, 139, 2022, 1210, 2322, 1011, 2122, 1012, 2122, 1013, 2122, 1014, 2122, 1015, 2122, 1016, 2122, 1017, 2122, 1018, 2122, 1019, 2122, 1020, 2122, 1021, 2122, 1022, 2122, 1023, 2122, 1024, 2122, 1025, 2122, 1126, 2322, 1132, 2122, 1033, 2122, 1034, 2122, 1035, 2122, 1036, 2122, 1037, 2122, 1038, 2122, 1039, 2122, 1040, 2122, 1041, 2122, 1042, 2122, 1043, 2122, 1044, 2122, 1045, 2122, 1046, 2122, 1047, 2122, 1248, 2322, 1349, 2322, 1054, 2022, 104, 2021, 129, 2021, 1310, 2221, 1348, 2121, 1249, 2221, 1054, 2021, 104, 2020, 109, 2020, 1049, 2020, 1054, 2020, 104, 2019, 109, 2019, 1049, 2019, 1054, 2019, 104, 2018, 109, 2018, 1049, 2018, 1054, 2018, 104, 2017, 109, 2017, 1114, 2117, 1015, 2117, 1016, 2117, 1017, 2117, 1018, 2117, 1019, 2117, 1020, 2117, 1021, 2117, 1022, 2117, 1023, 2117, 1024, 2117, 1025, 2117, 1126, 2317, 1132, 2117, 1033, 2117, 1034, 2117, 1035, 2117, 1036, 2117, 1037, 2117, 1038, 2117, 1039, 2117, 1040, 2117, 1041, 2117, 1042, 2117, 1043, 2117, 1144, 2317, 1049, 2017, 1054, 2017, 104, 2016, 109, 2016, 1049, 2016, 1054, 2016, 104, 2015, 109, 2015, 1049, 2015, 1054, 2015, 104, 2014, 109, 2014, 1049, 2014, 1054, 2014, 104, 2013, 109, 2013, 1114, 2113, 1015, 2113, 1016, 2113, 1017, 2113, 1018, 2113, 1019, 2113, 1020, 2113, 1021, 2113, 1022, 2113, 1023, 2113, 1024, 2113, 1025, 2113, 1126, 2313, 1132, 2113, 1033, 2113, 1034, 2113, 1035, 2113, 1036, 2113, 1037, 2113, 1038, 2113, 1039, 2113, 1040, 2113, 1041, 2113, 1042, 2113, 1043, 2113, 1144, 2313, 1049, 2013, 1054, 2013, 104, 2012, 109, 2012, 1049, 2012, 1054, 2012, 104, 2011, 109, 2011, 1049, 2011, 1054, 2011, 104, 2010, 109, 2010, 1049, 2010, 1054, 2010, 104, 209, 129, 209, 1310, 239, 1348, 209, 1249, 229, 1054, 209, 104, 208, 139, 218, 1210, 218, 1011, 218, 1012, 218, 1013, 218, 1014, 218, 1015, 218, 1016, 218, 1017, 218, 1018, 218, 1019, 218, 1020, 218, 1021, 218, 1022, 218, 1023, 218, 1024, 218, 1025, 218, 1126, 238, 1132, 218, 1033, 218, 1034, 218, 1035, 218, 1036, 218, 1037, 218, 1038, 218, 1039, 218, 1040, 218, 1041, 218, 1042, 218, 1043, 218, 1044, 218, 1045, 218, 1046, 218, 1047, 218, 1248, 218, 1349, 228, 1054, 208, 104, 207, 1054, 207, 104, 206, 1054, 206, 104, 205, 1054, 205, 124, 204, 135, 234, 1353, 204, 1254, 224, 134, 213, 125, 213, 106, 213, 107, 213, 108, 213, 109, 213, 1010, 213, 1011, 213, 1012, 213, 1013, 213, 1014, 213, 1015, 213, 1016, 213, 1017, 213, 1018, 213, 1019, 213, 1020, 213, 1021, 213, 1022, 213, 1023, 213, 1024, 213, 1025, 213, 1126, 233, 1132, 213, 1033, 213, 1034, 213, 1035, 213, 1036, 213, 1037, 213, 1038, 213, 1039, 213, 1040, 213, 1041, 213, 1042, 213, 1043, 213, 1044, 213, 1045, 213, 1046, 213, 1047, 213, 1048, 213, 1049, 213, 1050, 213, 1051, 213, 1052, 213, 1253, 213, 1354, 223); |
On the back-end in the Apple Muncher source file, I parse all of these numbers based on the level being loaded and do what is needed based on the values retrieved.
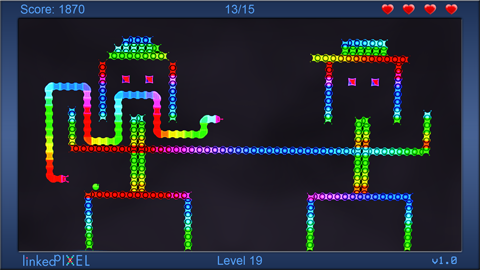
Apple Muncher Gameplay Screenshot (Plasma Mode)
Odds and Ends
Panasonic did not provide any means to emulate the application being developed on a PC. Testing always had to be done through the Panasonic VIERA Connect app on the television itself, the complexities of which I detailed in part one. This led to a couple development hurdles that I've come to take for granted in other platforms.
Console Logging
When developing standard JavaScript applications, I make heavy use of console logging to trace variables and help debug any issues that arise. Every modern browser supports a developer console and DOM inspector and it is as simple as calling console.log("message") to send messages to the console. To achieve similar functionality in an app being developed via Ajax-CE for Panasonic's market, a few additional server-side scripts were required. To Panasonic's credit, they supplied these files and it was pretty simple to implement as long as your server was configured with Perl. The steps to enable console logging are essentially:
- Copy the supplied Perl script to your cgi-bin directory and configure the Perl path.
- Copy the provided JavaScript file to the main app folder and change the path to point to the Perl script.
- Add an include to the JavaScript file from the main source file.
- Create a blank log file in a temporary folder.
- Log to the text file using the standard console.log() syntax.
This essentially sends POST data back to the Perl script every second, and the Perl script then writes the data to the log file.
Screenshots
Part of the app submission process required the production of five screenshots. This was easier said than done as Panasonic did not provide any documented way to capture the screen as an image. Since the app must run through the VIERA Connect market embedded into the TV, it was not even possible to run the signal through a capture card. It would have been fantastic if Panasonic could have incorporated a simple function to save the screenshot to the server or memory card. As it was, I ended up taking photographs of my TV screen and then cleaning them up to produce most of the needed screenshots.
Memory Card Access / Data Storage
Speaking of memory cards, one key bit of information absent from the API documentation is how to read or write data to the device for storing user preferences. I had assumed before purchasing the Panasonic developer license that I would be able to store and retrieve data from the internal or SD memory card just like the GameLoft games had done. Not so. As it is, the Ajax-CE platform for third parties does not publicly disclose how to write data to the system in any way, shape or form. You can make simple HTTP requests from the app to send data to the server and back, as I do for the high score records, but saving user data locally is more shrouded in secrecy.
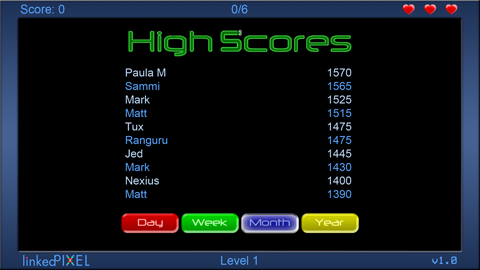
Apple Muncher High Score Page
I inquired to Pansonic about this specific point. In my app, I simply wanted to save the last entered high score name when the user exited the app as a convenience to them. I was advised that I could indeed save credential data and other basic information to the internal flash memory, but that the part of the system is sensitive so the solution is not published to their portal. They did supply me with the needed script and API functions for doing so, but I feel like this is a crucial part of any app and should not be invisible to third party developers and it would have been nice to interface with the SD card as well, if one was installed.
In the next installment I will detail the long and drawn out submission and approval process.
Apple Muncher Project Postmortem - The Series
Below are the four installments of this series:
Pingback: Project Postmortem: Panasonic VIERA Connect (3) | Matt's Repository
Pingback: Project Postmortem: Panasonic VIERA Connect (1) | Matt's Repository
Thanks for that brilliant game.
Do you know the all-time highest score?
I noticed 2 errors. Are you interested in details?
Hi KMS, nice to meet you! Looks like you are the top player of all time (with 20365)! In fact "KMS" holds the top 23 positions of all-time. Impressive - especially how you made it to the final levels that I even found difficult. Thank you for the compliments! I am still working to finish part 4 of this blog series many years later that will describe how many users have played it. I was surprised to see how popular this game became after I made it free a long time ago; it still gets a lot of traffic.
Sure - you can let me know about the errors and I will see if I can fix them, time-permitting. Would you also be interested in sharing more thoughts about what you like so much about the game, how you found it and what device you play on so that I can include the comments with my next blog entry?
Hi Matt, thanks for your answer. The first error is in calculating the bonus points: Obviously there are 5 points for each extra segment that one has moved around. But, in summary there are always 5 points missing - such as the initial snake length would have been one segment more. The second error can be examined only at start or restart of level 21: There is a small time interval in which the snake can "tunnel" the boundary on the right side of the snake, if the "cursor right" key is pressed in that time.
Then there is a third thing (no "error", I guess): If you observe very accurate, than you can see discontinuities in the snake's velocity, which limits success, if the sanke has become very fast.
Most of other Panasonic games I have seen, are rather stupid, except "Free Cell", but this seems to have...
... a fake algorithm included, since the guessing success is strongly below statistical probability. For playing I use the standard TV remote control and I wonder which other devices could be possible.
The fascinating aspect of the game is finding move- and reaction-strategies which minimize error risks. This point is not obvious when you are novice.
Thank you again for your time.
Sry. Not "Free Cell", but "Mine Sweeper".
Pingback: Apple Muncher Project Postmortem: Developing for Panasonic VIERA Connect SmartTV (Part 4) | Matt's Repository